The Story Behind the Success of Pop Danthology

Speed up your Internet speed
Problem with your speed connection?
Complete the most accurate test by clicking on “Begin Test.” Speedtest. will automatically select the server with the lowest ping time. This means you will be connected to the closest server from a computer networking perspective. Speedtest.net provides hundreds of different servers located around the globe, thereby eliminating internet congestion that negatively impacts your speed test.
The “Begin Test” method is the most reliable, but feel free to experiment with manually choosing a server by selecting the white locator dots on the “Begin Test” map. You may also select a “Preferred Server” in your Settings to permanently give a selected server priority in any future tests. Due to Internet congestion and unpredictable ping times, you are usually better off letting Speedtest. select the best server for each test.
Test often and at different times of the day to ensure that your connection is up to speed! Utilize the My Results page to compare your Internet connection with others, and remember to use your test results when searching for solutions or settling disputes with your Internet service provider.

Links:
CHECK YOU SPEEDTEST FOR FREE

How it works
Start the speed test by clicking on the big button in the center of the page. The check will start by downloading a file and will measure your download speed. Once the download has finished, the broadband speed test will try to upload a file and will measure your upload speed
If you want to get accurate results then you should not use your internet connection for any other applications once the speed checker is running.Speed test is performed against the nearest of these servers – Ashburn (VA), Dallas/Fort Worth (TX), Los Angeles (CA), Miami (FL), Newark (NJ), Palo Alto (CA), Seattle (WA), St. Louis (MO)
FAQ
What must be installed to use Broadband speed checker?
Speed checker should work in any web browser that supports Flash of version 8 and javascript.
Why the download or upload test does not work?
If you have a firewall or antivirus software installed that is not configured properly, then speed checker may not work correctly. Try to disable the firewall / antivirus when you are running the speed checker. After the test has been completed do not forget to turn it back on so you stay protected.
What does kbps mean?
It means kilobits per second. Usually, when you purchase a broadband then ISP explains speed in Mb. 1 Mb has 1024 kilobits.

What might affect my speed test?
Any applications running on your PC can affect the speed, so you should disable temporarily :
- email checking software
- instant messenger or other chat software
- internet radio
- windows updates
- any other downloading
How does the speed checker work?
Our speed checker downloads a file from the server and measures how long your connection takes to download it. The size of the file will be different according to your line speed.
How accurate is the speed checker?
We have tried to build the speed checker as accurate as possible but there are several factors that can affect the test. The speed checker measures the speed at the time of the test so if your network is running slow at that time then speed checker will report a slow speed. This does not necessarily mean that your internet connection is slow at the other times.
How long it takes the speed checker to complete?
About 20 seconds.
Make your speedtest now
Instructions: Our calculator measures the estimated time needed to download a file at different connection speeds. Simply type in the file size in the field below and choose a measurement unit. The fields below will automatically populate with estimated download times *based on connection speed.

KB(Kilobytes)
MB (Megabytes)
GB (Gigabytes)
TB (Terabytes)
| Connection | Capacity | Time |
|---|---|---|
| 33.6 K (Modem) | 33,600 bps | 41 mins, 36 secs |
| 56 K (Modem) | 56,000 bps | 24 mins, 57 secs |
| 64 K (DS-0) | 64,000 bps | 21 mins, 50 secs |
| 128 K (ISDN) | 128,000 bps | 10 mins, 55 secs |
| 256 K (DSL) | 256,000 bps | 5 mins, 27 secs |
| 640 K (DSL/Cable) | 640,000 bps | 2 mins, 11 secs |
| 768 K (DSL/Cable) | 768,000 bps | 1 min, 49 secs |
| T1, DS-1 | 1.544 Mbps | 54 secs |
| T3, DS-3 | 44.736 Mbps | 1 sec |
| OC-1 | 51.840 Mbps | 1 sec |
| OC-3 | 155.520 Mbps | Less than a second. |
| OC-12 | 622.520 Mbps | Less than a second. |
| OC-48 | 2.488 Gbps | Less than a second. |
| OC-192 | 10Gbps | Less than a second. |
*Note: these calculations assume a “perfect” connection at the stated speed. Actual performance will vary due to retries, latency, transmission protocol requirements, and other concurrent traffic.
Computer are like our cars. they need tune up and check out every other months to keep it running fine. Norton have the best tools to do the job for you and Xfinity from Comcast has this Norton for free for customer ; here is the link to download the Norton security suite
 As an XFINITY Internet customer, you can now get the top-rated Norton Security Suite and Norton™ Internet Security for Mac®. It helps protect your computer, files and identity without slowing you down. Plus, get Norton Online Family to safeguard your kids online.
Superior Protection, Fastest Performance
- A $160 dollar value at no additional cost with your XFINITY Internet subscription.

Norton Security Suite for Windows
Key security features include:
- Core Protection – against viruses, spyware, Trojan horses, worms, bots, and rootkits
- Advanced Protection – against browser, OS, and application threats
- Identity Protection – blocks phishing Web sites and authenticates trusted sites

August 11th, 2010
Upload vs. Download
posted by Hanna
Upload vs. Download, what’s the difference?
For the average user, download throughput is the primary metric used when considering the speed of your broadband package to measure the quality of your online experience. Download throughput represents how quickly you can receive information, such as reading email, browsing web pages, downloading content such as music, photos or applications as well as the quality and buffer rate when streaming video.
Because download is more meaningful for popular activities, residential Internet packages are typically asynchronous, and normally download is much faster than upload. An example: 5.0Mbps/1.5Mbps package means 5 megabits of downstream per second, while only a fraction of the upstream at 1.5 megabits per second. Packages vary widely with some having upload as low as 128Kbp/s or just about twice as fast as a dial-up connection. In a future post we will provide suggested download and upload speeds for a variety of online activities.
Naturally, upload speeds are very important if you are hosting information via a web or email server. This is because the upload throughput will determine how quickly other users can access information from your network. Your upload is another person’s download and vice versa. Most residential users aren’t hosting servers, so in that respect upload is typically not a big issue.
However, where upload throughput really matters is when you want to quickly share outbound content from your connection. Examples of these activities include sending an email and uploading photos or video to a website like Facebook, Flickr or YouTube. As more users have a higher need to send large emails and post higher resolution photos and videos to websites, upload is telling a larger part of the whole story. Another increasingly popular use of upload is peer-to-peer (P2P) file sharing programs, such as BitTorrent, where upload is required to continually send content in order to have the privilege of downloading. VoIP, Video Conferencing and Online Gaming also require upload throughput for the bi-directional interactions.
So, depending on what you are looking to do with your broadband connection, be sure to consider upload speed carefully. Remember that although neither are particularly fast, even 256Kbp/s will allow you to upload twice as fast as 128Kbp/s and you’ll appreciate that the next time you upload pictures or send that big email attachment to a friend.
October 27th, 2010
Improve your Internet speed
posted by Hanna
We believe that everyone should have free access to tools and information that help them get the best possible value from their Internet service. Our company has been working to ensure that the public gets faster, more high-quality Internet for years, and the goal of this post is to share that expertise with you. The power to optimize one’s Internet performance and increase overall satisfaction could be just a few simple steps away.
Remember: the overall quality and speed of an Internet connection is largely determined by the capabilities of your Internet Service Provider (ISP). However, there are questions you can ask – and answer! – to help ensure that you’re getting the most value from your connection.
To learn more about this topic, please read our full article “Improve your Internet speeds” in our Wiki.
http://wiki.ookla.com/improve_your_internet_speeds
What is Pingtest.net?
Use Pingtest.net to determine the quality of your broadband Internet connection. Streaming media, voice, video communications, and online gaming require more than just raw speed. Test your connection now to get your Pingtest.net rating and share the result
About the Line Quality Components:
Packet Loss
Much as it sounds, if you have anything less than complete success in transmitting and receiving “packets” of data then you are experiencing this problem with your Internet connection. It can mean much slower download and upload speeds, poor quality VoIP audio, pauses with streaming media and what seems like time warping in games — your connection may even come to a total standstill! Packet loss is a metric where anything greater than 0% should cause concern.
Ping
This measurement tells how long it takes a “packet” of data to travel from your computer to a server on the Internet and back. Whenever you experience delayed responses in Internet applications – this would be due to a higher than desired ping. Similar to packet loss, lower is better when it comes to ping. A result below 100 ms should be expected from any decent broadband connection.
Jitter
Once you understand ping, jitter should also make sense. Jitter is merely the variance in measuring successive ping tests. Zero jitter means the results were exactly the same every time, and anything above zero is the amount by which they varied. Like the other quality measurements, a lower jitter value is better. And while some jitter should be expected over the Internet, having it be a small fraction of the ping result is ideal.
Instantly boost your Broadband speed by around 5 X with one easy click.
YouTube Video
You don’t have to spend more money upgrading your high speed Internet Broadband service to get faster Internet speed.
We looked in to other options and found out and proved that anyone can get about 5 X faster Internet speed from their existing Broadband connection with one simple step.
We did real life tests to see if it was possible and would actually work and we found that it can be done very easily.
This video shows a quick summary of our tests and the solution.
See more details on http://www.GetFullSpeed.com
Web Speed Test Page – http://www.getfullspeed.com/default.html
Another online third pary broadband speed tester:
http://www.speakeasy.net/speedtest/
How to use MSCONFIG in Windows XP and Vista
If you have ever had a tech support call regarding what programs start, when you boot up Windows XP, you may have heard the term MSCONFIG. Perhaps you were instructed by a technician where to go and what to do with this tool. Granted, this is not necessarily something that one would use on a daily basis. However, there are occasions when MSCONFIG is quite useful, providing there is practical information on how to utilize it.
Before we get into what MSCONFIG is used for, we need to know how to access it. This is accomplished by left-click on Start, then Run. While in the Run dialog box, type in MSCONFIG (it is not case-sensitive) in white space, then left-click on Ok. It is important to note, before proceeding, that any changes made in MSCONFIG require a reboot before they are permanent.


A medium-sized window will pop-up on your screen, with a selection of six tabs. The first tab, which is selected by default, is the General tab. Is this view, you will see three selectable radio buttons under the Startup Selection heading. Normal Startup will be selected if you have never used MSCONFIG. Diagnostic Startup will start Windows XP up in a “stripped down” functionality mode, akin to a Safe Mode startup. If you choose this option, remember to change it back when you are done troubleshooting, or Windows will keep starting up in this manner.
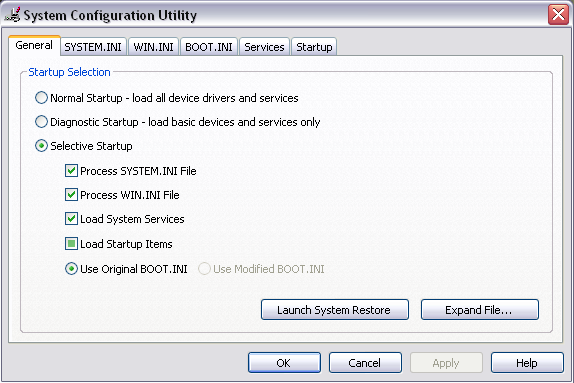
If one does not encounter the Normal Startup being selected in MSCONFIG, they will see the Selective Startup having the dot next to it. This means that something has been altered with Windows, and only the active items will start. Not to panic though, it may have been as simple as a startup item being removed from its list. Maybe the BOOT.INI file was modified to allow different boot option with Windows.
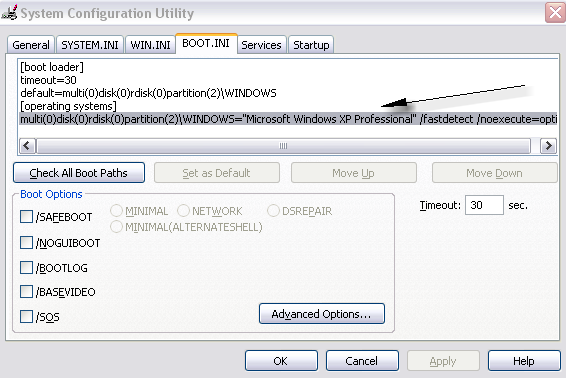
While I do not intend to get too deep into the nuts and bolts of the SYSTEM.INI, WIN.INI, and BOOT.INI tabs, I do want to show an example of what a typical BOOT.INI screen looks like. In this screen shot, we see some standard boot commands with a Windows XP Professional setup on a single hard drive.
One of the reasons is that I would not want a computer user to venture boldly into the WIN and SYSTEM settings, is that any small change may cause Windows to break and sink faster than the Titanic. I do not believe there is enough room in this post for all the documentation. I recommend consulting your local computertechnician or the Microsoft Knowledgebase.
Oddly enough, the next tab over, Services, has a feature that I personally believe should be available in the other dangerous areas. In the Services tab, you see all of your computer’s services relating to Windows, and any other program on your machine that is installed as a service. The nice item in this screen is the Essential column heading (screen shot annotation #1). This annotates that a listed service is necessary to run Windows. Should you deselect it, well, it goes without saying that things, not necessarily good ones, will happen.

While in the Services tab, you can look at any non-Windows service by left-clicking on the Hide All Microsoft Services checkbox (screen shot annotation #2). Doing this is not damaging to Windows, it is simply a toggle switch. You can also Disable All (screen shot annotation #3) services if you want to, enough said.
The last tab in MSCONFIG is one of the more frequently visited areas. The Startup tab controls what programs start with Windows. If you want a program to not start alongside Windows, simply uncheck the box on the left-hand side of the window, under Startup Items, and it will not start with Windows. Following the columns to the right, you will notice the program or command that runs with the start item, as well as the actual location in the Windows Registry where a reference is for that item.
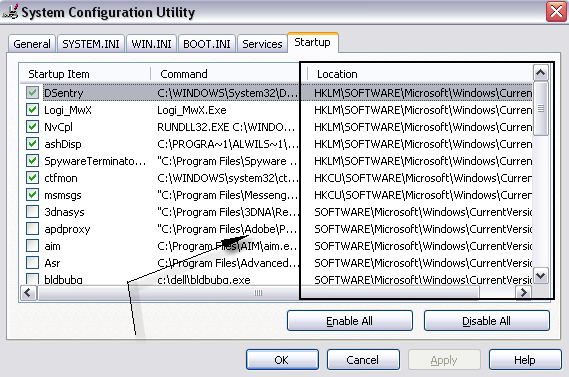
There are exceptions to the MSCONFIG rule of stopping startup programs. Various computer viruses, Trojans, and Spyware programs insert themselves into the Startup list, and are capable of self-repair. If you uncheck a suspicious program from the Startup list, only to look at MSCONFIG after a reboot, and it is still checked, there is a possibility that you have a malicious program on your computer.
It is also possible that if you update certain programs, like Adobe Acrobat Reader, it will reinsert items into the startup list after updates are run. However, as shown in the screen shot above, programs like Adobe are easy to spot on the Startup list.
This is a guest post by Charles Brader, a tech enthusiast and blogger.
Technorati Tags: Msconfig,Windows Startup,Startup,Boot.ini file,Win.ini file,System.ini file,Boot Options
Download antivirus for FREE
From AT&T home page
Norton
From Xfinity home page:read in the norton area above this info, the link is been provided to dwonload Norton
Avast,Avira,Panda,Trendmicro,etc
More antivirus for free from CNET webpage
2012 Internet Browser Software Product Comparisons
2012 Internet Browser Software Product Comparisons

|
||||||||||||||||||||||||||||||||||||||||||||||||||||||||||||||||
 |
||||||||||||||||||||||||||||||||||||||||||||||||||||||||||||||||


Internet Browser Software Review
Why Internet Browsers?
An internet browser is a software application that enables you to browse the world wide web, locating and accessing webpages. Browsers translate HTML code, allowing you to read text, view images, play videos and listen to audio clips on websites. They also interpret hyperlinks that allow you to travel to different webpages when clicked on. While internet browsers are primarily intended to access the internet, they can also be used to access private information on web servers or through file systems.
Internet Browsers: What to Look For
Heavy web users need an internet browser that is both fast and secure, and though all browsers enable internet access, not all are created equal. Different browsers can render webpages differently, and there can be a large disparity in performance between the top competitors. The three main things to consider when choosing an internet browser are simplicity, speed and security. Excelling in each of these areas, Google Chrome, Firefox and Internet Explorer are among the current best internet browsers. To learn more, check out our side-by-side comparisons andarticles on internet browsers. The following is the in-depth criteria we used to evaluate the best internet browsers on the market.
Feature Set – A web browser should provide practical, convenient features that make surfing the web easy and fast. For instance, a browser should offer tabbed browsing, a customizable toolbar and an integrated search engine. For a more personalized web experience, the browser should also provide the ability to save bookmarks, set parental controls and create RSS feeds. Generally speaking, the more features an internet browser provides, the better.
Security – While online security measures have come a long way since the inception of the internet, the web is still rife with security risks, namely small-scale attacks to hack electronic data. Security features such as privacy settings, a pop-up blocker and antispyware enable safe internet surfing and help keep personal information such as passwords secure.
Speed & Compatibility – Web browsers should load quickly and be compatible with all major operating systems. We tested the speed of each browser in our lineup using the same Windows 7 system and a stopwatch, timing how quickly each one initially started up and was able to navigate between websites. A top internet browser will load and navigate between pages within just a few seconds.
Ease of Use – The best internet browsers are those that strike a seamless balance between features and ease of use. While features on a web browser are important, they become worthless if a browser’s interface hinders your ability to utilize them. Web browsers should boast an intuitive layout that fosters easy and convenient navigation.
Help & Support – Although some internet browsers are open source and therefore not supplemented with dedicated technical support, we still considered the quality of support options available. When it comes to internet browsers, available support can come in many forms, ranging from FAQs to tutorials, email support to a product manual.
While all internet browsers will provide access to the internet, selecting a fast and secure one will ensure safe and enjoyable online browsing. At TopTenREVIEWS We Do the Research So You Don’t Have To.™
How do I locate my bank routing number and checking account number?
| Q. How do I locate my bank routing number and checking account number? | ||||||
 A. You can find the Bank Routing Number and your Checking Account Number within the string of numbers located at the bottom of one of your checks. Make sure you are using a check and NOT a deposit slip, since the numbers may not be the same. If your Account Number is not clearly recognizable, you can identify it by following the steps below.
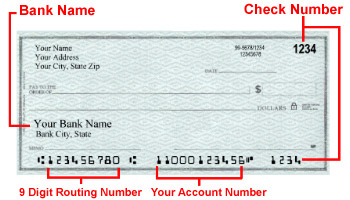 Step 2: Find the Check Number Locate the string of numbers at the bottom of your check that matches the Check Number in the upper right-hand corner. This number is usually 4 digits, and may include a zero as the first digit. Draw a line through these digits. Step 3: Identify the remaining numbers The numbers that are left – those that are neither the Bank Routing Number nor the Check Number – are your Account Number. NOTE: If you notice extra zeroes before or after your account number, please include them as part of your account number.
|
¿Cómo puedo encontrar mi número de ruta bancaria y número de cuenta corriente?
P. ¿Cómo puedo encontrar mi número de ruta bancaria y número de cuenta corriente?
R. Puede encontrar el número de ruta bancaria y su número de cuenta corriente dentro de la cadena de números situados en la parte inferior de uno de sus cheques. Asegúrese de que está usando un cheque y no una boleta de depósito, ya que los números no pueden ser los mismos. Si su número de cuenta no es claramente reconocible, puede identificar siguiendo los pasos a continuación.
Los números en la parte inferior de su cheque incluyen un banco de 9 dígitos de número de ruta, su número de cuenta y el número de cheque. Puede encontrar su número de cuenta en el proceso de eliminación. Puede ser útil para escribir la cadena de números en una hoja de papel primero. Al escribir sus números de banco, hacer caso omiso de los caracteres especiales que puede tener este aspecto:
Paso 1: Encuentre su número de ruta bancaria
Los primeros 9 números de la izquierda en la parte inferior de su cheque es su número de ruta bancaria. Este número es siempre 9 dígitos. Encierra en un círculo los 9 dígitos.
TIP: descubra los caracteres especiales que se muestran a la derecha. El número de ruta del banco se encuentra entre estos personajes
Paso 2: Busque el número de cheque
Busque la cadena de números en la parte inferior de su cheque que coincida con el número de cheque en la parte superior derecha de la esquina. Este número suele ser de 4 dígitos y puede incluir un cero como primer dígito. Dibuja una línea a través de estas cifras.
Paso 3: Identificar los números restantes
Los números que quedan – aquellos que no son ni el número de ruta bancaria ni el número de cheque – son su número de cuenta.
NOTA: Si observa ceros adicionales antes o después de su número de cuenta, por favor incluya como parte de su número de cuenta.
TIP: Busque el carácter especial de la derecha. Su número de cuenta es justo a la izquierda de este personaje.
The Best Wallpaper Chess ever

 |


De beste Wallpaper Chess ooit
Tags: HD schaken behang, schaken behang, schaken, Ajedrez, schaken achtergrond, fondos de Ajedrez,
Najlepsze Chess Wallpaper kiedykolwiek
Tagi: tapety, szachy HD, tapety szachy, szachy, Ajedrez, tło szachy
Лучшие обои Шахматы никогда
Теги: HD обои шахматы, шахматы обои, шахматы, Ajedrez, шахматы фона, Fondos де Ajedrez,
Les échecs Meilleur Fond d’écran jamais
Tags: fonds d’écran HD échecs, papier peint échecs, échecs, ajedrez, fond d’échecs, fondos de ajedrez,
The Best Wallpaper Schach immer
Tags: HD Schach wallpaper, Schach wallpaper, Schach, ajedrez, Schach Hintergrund,
उत्तम वॉलपेपर शतरंज कभी
टैग: HD वॉलपेपर शतरंज, शतरंज वॉलपेपर, शतरंज, ajedrez, शतरंज पृष्ठभूमि, fondos डे ajedrez,
Кращі шпалери Шахи ніколи
Теги: HD шпалери шахи, шахи шпалери, шахи, Ajedrez, шахи фону, Fondos де Ajedrez,
Den bästa Bakgrund Chess någonsin
Taggar: HD schack tapeter, schack tapet, schack, ajedrez, schack bakgrund, fondos de Ajedrez,
Το καλύτερο σκάκι Wallpaper ποτέ
Ετικέτες: HD ταπετσαρία σκάκι, ταπετσαρία σκάκι, σκάκι, Ajedrez, φόντο σκάκι,
للشطرنج أفضل من أي وقت مضى للجدران
به: HD خلفية الشطرنج، الشطرنج للجدران، والشطرنج، ajedrez، الخلفية الشطرنج، fondos دي ajedrez،
CHEATING AT YAHOO CHESS!
Here You will understand how people cheat at Yahoo Chess site, How They made it, How to avoid them, or just simple : How to cheat at Yahoo as well.
|
Cheating at chess apparently has a long and proud history. Wood cites Ruy Lopez’s 16th century advice to “arrange the board so that it reflects the light into your opponent’s eyes.” He also passes along the historical suspicion that Napoleon would make illegal moves whenever he felt he was losing his chess game. I suppose his opponents would overlook such gentle indiscretions, given the alternatives available for Bonaparte to assuage his wounded pride.
 One of the first thing that we should analize is the promise of all cheat program to make a dream come true; I have a perfect example here (*********) does more than play Yahoo chess…this chess auto puts you in league with the pros! If you’re one of the many chess players who is intimidated by chess, has a low rating, or just wants to learn how to play, then there is a perfect chess bot for you — (*******) Created specifically with you in mind, this chess cheat completes any job; need a Yahoo chess ratings boost, . Whether you want to use the advanced chess strategy to earn a 2100+ rating in the span of a day, or want something to offer you hints when you need them, this is the chess auto for you. (*******)is a chess cheat no Yahoo chess player should be without.
Honesty I will get it if I feel I need to satisfy my personal need. Besides who don’t want to kick ass in the chess room or a chess tournament.
How To Cheat Online Yahoo ChessPosted by chaitanya.gk at Sunday, September 28, 2008
Cheating and winning games is a fun way of doing isn’t?. Beating world wide opponents needs a real class and brain, yeah!! I am talking about online yahoo chess. There are many tools available on web to cheat Y! chess and outsmart your partners but I am sure they aren’t for FREE!. Here’s a free and clean way of winning and keeping your rating high!

I used the same technique no only at Yahoo chess server ;But any chess server that I allow You to play with in a range of time that you can feel comfortable.
|
What is Electronic voice phenomena (EVP)
What is Electronic voice phenomena (EVP)
Electronic voice phenomenon
From Wikipedia, the free encyclopedia
Electronic voice phenomena (EVP) are electronically generated noises that resemble speech, but are
supposedly not the result of intentional voice recordings or renderings. Common sources of EVP include static,
stray radio transmissions, and background noise. Recordings of EVP are often created from background sound
by increasing the gain (i.e. sensitivity) of the recording equipment.[1]
Interest in EVP surrounds claims that it is of paranormal origin[2], although many occurrences have had natural
explanations including apophenia (finding significance in insignificant phenomena), auditory pareidolia (interpreting random sounds
as voices in one’s own language), equipment artifacts, and hoaxes.
as voices in one’s own language), equipment artifacts, and hoaxes.
Parapsychologist Konstantin Raudive, who popularized the idea,[3] described EVP as typically brief, usually the
length of a word or short phrase.[4]
[edit]History
As the Spiritualism religious movement became prominent in the 1840s–1920s with a distinguishing belief that the
spirits of the dead can be contacted by mediums, new technologies of the era including photography were
employed by spiritualists in an effort to demonstrate contact with aspirit world. So popular were such ideas
that Thomas Edison was asked in an interview with Scientific American to comment on the possibility of
using his inventions to communicate with spirits. He replied that if the spirits were only capable of subtle
influences, a sensitive recording device would provide a better chance of spirit communication than the table
tipping and ouija boards mediums employed at the time. However, there is no indication that Edison ever
designed or constructed a device for such a purpose.[5] As sound recording became widespread, mediums
explored using this technology to demonstrate communication with the dead as well. Spiritualism declined in
the latter part of the 20th century, but attempts to use portable recording devices and modern digital technologies
to communicate with spirits continued.[6]
[edit]Early interest
American photographer Attila von Szalay was among the first to try recording what he believed to be voices of
the dead as a way to augment his investigations in photographing ghosts. He began his attempts in 1941 using a
78 rpm record, but it wasn’t until 1956, after switching to a reel-to-reel tape recorder, that he believed he was
successful.[7] Working with Raymond Bayless, von Szalay conducted a number of recording sessions with a
custom-made apparatus, consisting of a microphone in an insulated cabinet connected to an external recording
device and speaker. Szalay reported finding many sounds on the tape that could not be heard on the speaker
at the time of recording, some of which were recorded when there was no one in the cabinet. He believed these
sounds to be the voices of discarnate spirits. Among the first recordings believed to be spirit voices were such
messages as “This is G!”, “Hot dog, Art!”, and “Merry Christmas and Happy New Year to you all”.[7] Von Szalay
and Raymond Bayless‘ work was published by the Journal of the American Society for Psychical Research in 1959.[8]
Bayless later went on to co-author the 1979 book, Phone Calls From the Dead.
Bayless later went on to co-author the 1979 book, Phone Calls From the Dead.
In 1959, Swedish painter and film producer Friedrich Jürgenson was recording bird songs. Upon playing the tape
[edit]Raudive voices
Konstantin Raudive, a Latvian psychologist who had taught at the University of Uppsala, Sweden and who had
worked in conjunction with Jürgenson, made over 100,000 recordings which he described as being
communications with discarnate people. Some of these recordings were conducted in an RF-screened laboratory
and contained words Raudive said were identifiable.[4][6] In an attempt to confirm the content of his collection
[edit]Spiricom & Frank’s Box
In 1980, William O’Neil constructed an electronic audio device called “The Spiricom.” O’Neil claimed the device
was built to specifications which he received psychically from George Mueller, a scientist who had died six years
previously.[2][6] At a Washington, DC press conference on April 6, 1982, O’Neil stated that he was able to hold
two-way conversations with spirits through the Spiricom device, and provided the design specifications to
researchers for free. However, nobody is known to have replicated the results O’Neil claimed using their own
Spiricom devices.[12][13] O’Neil’s partner, retired industrialist George Meek, attributed O’Neil’s success, and the
inability of others to replicate it, to O’Neil’s mediumistic abilities forming part of the loop that made the system
Another electronic device specifically constructed in an attempt to capture EVP is “Frank’s Box” or the
“Ghost Box”. Created in 2002 by EVP enthusiast Frank Sumption for supposed real-time communication with
the dead, Sumption claims he received his design instructions from the spirit world. The device is described as a
combination white noise generator and AM radio receiver modified to sweep back and forth through the AM band
selecting split-second snippets of sound. Critics of the device say its effect is subjective and incapable of being
replicated, and since it relies on radio noise, any meaningful response a user gets is purely coincidental, or simply
the result of pareidolia.[15]
[edit]Modern interest
In 1982, Sarah Estep founded the American Association of Electronic Voice Phenomena (AA-EVP)
in Severna Park, Maryland, a nonprofit organization with the purpose of increasing awareness of EVP,
and of teaching standardized methods for capturing it. Estep began her exploration of EVP in 1976, and
says she has made hundreds of recordings of messages from deceased friends, relatives, and other individuals,
including Konstantin Raudive, Beethoven, a lamplighter from 18th century Philadelphia, Pennsylvania,
and extraterrestrials whom she speculated originated from other planets or dimensions.
The term Instrumental Trans-Communication (ITC) was coined by Ernst Senkowski in the 1970s to refer
more generally to communication through any sort of electronic device such as tape recorders, fax machines,
television sets or computers between spirits or other discarnate entities and the living.[2][16] One particularly
famous claimed incidence of ITC occurred when the image of EVP enthusiast Friedrich Jürgenson
(whose funeral was held that day) was said to have appeared on a television in the home of a colleague,
which had been purposefully tuned to a vacant channel.[2] ITC enthusiasts also look at TV and video camera
In 1979, parapsychologist D. Scott Rogo described an alleged paranormal phenomenon in which people report
that they receive simple, brief, and usually single-occurrence telephone calls from spirits of deceased relatives,
friends, or strangers.[19]
In 1997, Imants Barušs, of the Department of Psychology at the University of Western Ontario, conducted a
series of experiments using the methods of EVP investigator Konstantin Raudive, and the work of “instrumental
transcommunication researcher” Mark Macy, as a guide. A radio was tuned to an empty frequency, and over
81 sessions a total of 60 hours and 11 minutes of recordings were collected. During recordings, a person either
sat in silence or attempted to make verbal contact with potential sources of EVP.[2] Barušs stated that he did
record several events that sounded like voices, but they were too few and too random to represent viable data
and too open to interpretation to be described definitively as EVP. He concluded: “While we did replicate EVP
in the weak sense of finding voices on audio tapes, none of the phenomena found in our study was clearly
anomalous, let alone attributable to discarnate beings. Hence we have failed to replicate EVP in the strong
sense.” The findings were published in the Journal of Scientific Exploration in 2001, and include a literature
review.[2]
In 2005, the Journal of the Society for Psychical Research published a report by paranormal investigator
Alexander MacRae. MacRae conducted recording sessions using a device of his own design that
generated EVP.[20] In an attempt to demonstrate that different individuals would interpret EVP in the
recordings the same way, MacRae asked seven people to compare some selections to a list of five phrases
he provided, and to choose the best match. MacRae said the results of the listening panels indicated that the
Portable digital voice recorders are currently the technology of choice for EVP investigators. Since these
devices are very susceptible to Radio Frequency (RF) contamination, EVP enthusiasts sometimes try to
record EVP in RF- and sound-screened rooms.[23][24] Nevertheless, in order to record EVP there has to be
noise in the audio circuits of the device used to produce the EVP.[25] For this reason, those who attempt to
record EVP often use two recorders that have differing quality audio circuitry and rely on noise heard from the
poorer quality instrument to generate EVP.[26]
Some EVP enthusiasts describe hearing the words in EVP as an ability, much like learning a new
language.[27] Skeptics say that the claimed instances are all either hoaxes or misinterpretations of
natural phenomena. EVP and ITC are seldom researched within the scientific communityand, as ideas,
are generally derided by scientists when asked.[2]
[edit]Explanations and origins
Paranormal explanations for EVP generally assume production of EVP by a communicating intelligence
through means other than the typical functioning of communication technologies. Natural explanations for
reported instances of EVP tend to dispute this assumption explicitly and provide explanations which do
not require novel mechanisms that are not based on recognized scientific phenomena.
At least one study, by psychologist Imants Barušs, finds that EVP cannot be replicated under controlled
conditions.[28]
[edit]Natural explanations
There are a number of simple scientific explanations that can account for why some listeners to the static
on audio devices may believe they hear voices, including radio interference and the tendency of the human
[edit]Psychology and Perception
Auditory pareidolia is a situation created when the brain incorrectly interprets random patterns as being familiar
patterns.[30] In the case of EVP it could result in an observer interpreting random noise on an audio recording
as being the familiar sound of a human voice.[29][31][32] The propensity for an apparent voice heard in white
noise recordings to be in a language understood well by those researching it, rather than in an unfamiliar
language, has been cited as evidence of this,[29] and a broad class of phenomena referred to by author
Joe Banks as Rorschach Audio has been described as a global explanation for all manifestations
are usually recorded by raising the “noise floor” – the electrical noise created by all electrical devices
– in order to create white noise. When this noise is filtered, it can be made to produce noises which
sound like speech. Federlein says that this is no different from using a wah pedal on a guitar, which
is a focused sweep filter which moves around the spectrum and creates open vowel sounds. This,
according to Federlein, sounds exactly like some EVP. This, in combination with such things
as cross modulation of radio stations or faulty ground loops can cause the impression of paranormal
voices.[5] The human brain evolved to recognize patterns, and if a person listens to enough noise the
brain will detect words, even when there is no intelligent source for them.[37][38] Expectation also plays
an important part in making people believe they are hearing voices in random noise.[39]
Apophenia is related to, but distinct from pareidolia.[40] Apophenia is defined as “the spontaneous finding
of connections or meaning in things which are random, unconnected or meaningless”, and has been put forward
as a possible explanation.[41]
[edit]Physics
Interference, for example, is seen in certain EVP recordings, especially those recorded on devices which
contain RLC circuitry. These cases represent radio signals of voices or other sounds from broadcast
sources.[42] Interference from CB Radio transmissions and wireless baby monitors, or anomalies generated
though cross modulation from other electronic devices, are all documented phenomena.[29] It is even possible
Capture errors are anomalies created by the method used to capture audio signals, such as noise generated
Artifacts created during attempts to boost the clarity of an existing recording might explain some EVP.
Methods include re-sampling, frequency isolation, and noise reduction or enhancement, which can cause
The very first EVP recordings may have originated from the use of tape recording equipment with poorly
aligned erasure and recording heads, resulting in the incomplete erasure of previous audio recordings on the
tape. This could allow a small percentage of previous content to be superimposed or mixed into a new ‘silent’
recording.[45][citation needed]
[edit]Sporadic meteors and meteor showers
For all radio transmissions above 30 MHz (which are not reflected by the ionosphere) there is a possibility
of meteor reflection of the radio signal.[46] Meteors leave a trail of ionised particles and electrons as they
pass through the upper atmosphere (a process called ablation) which reflect transmission radio waves which
would usually flow into space.[47] These reflected waves are from transmitters which are below the horizon
of the received meteor reflection. In Europe this means the brief scattered wave may carry a foreign voice which
can interfere with radio receivers. Meteor reflected radio waves last between 0.05 seconds and 1 second,
depending on the size of the meteor.[48]
[edit]Paranormal explanations
Paranormal explanations for the origin of EVP include living humans imprinting thoughts directly on an
electronic medium through psychokinesis[49] and communication by discarnate entities such as spirits,
[edit]Organizations that show interest in EVP
There are a number of organizations dedicated to studying EVP and instrumental transcommunication,
or which
otherwise express interest in the subject. Individuals within these organizations may participate in investigations,
author books or journal articles, deliver presentations, and hold conferences where they share experiences.
The Association TransCommunication (ATransC), formerly the American Association of Electronic Voice
Phenomena (AA-EVP),[54] and the International Ghost Hunters Society conduct ongoing investigations
of EVP and ITC including collecting examples of purported EVP available over the internet.[55]
The Rorschach Audio Project, initiated by sound artist Joe Banks,[33][34][56][57] which presents EVP
as a product of radio interference combined with auditory pareidolia and the Interdisciplinary Laboratory
for Biopsychocybernetics Research, a non-profit organization dedicated studying anomalous psi phenomena
related to neurophysiological conditions.[58] According to the AA-EVP, it is “the only organized group of
researchers we know of specializing in the study of ITC.”.[59]
Spiritualists, as well as others who believe in Survivalism, have an ongoing interest in EVP.[60] Many
Spiritualists believe that communication with the dead is a scientifically proven fact, and experiment
with a variety of techniques for spirit communication which they believe provide evidence of the continuation
of life.[61] According to the National Spiritualist Association of Churches, “An important modern day development
in mediumship is spirit communications via an electronic device. This is most commonly known as Electronic
Voice Phenomena (EVP)”.[62] An informal survey by the
organization’s Department Of Phenomenal Evidence cites that 1/3 of churches conduct sessions in which
participants seek to communicate with spirit entities using EVP.[63]
The James Randi Educational Foundation offers a million dollars for proof that any phenomena, including
[edit]Cultural impact
The concept of EVP has had an impact on popular culture. It is popular as an entertaining pursuit,
as in ghost hunting, and as a means of dealing with grief. It has influenced literature, radio, film, and television.
Investigation of EVP is the subject of hundreds of regional and national groups and Internet message
boards.[65][66] Paranormal investigator John Zaffis claims, “There’s been a boom in ghost hunting ever
since the Internet took off.” Investigators, equipped with electronic gear—like EMF meters, video cameras,
and audio recorders—scour reportedly haunted venues, trying to uncover visual and audio evidence of ghosts.
Many use portable recording devices in an attempt to capture EVP.[65]
Films involving EVP include The Sixth Sense, White Noise,[67] The Changeling. It has also been featured
on television series like Ghost Whisperer, The Omega Factor, A Haunting, Ghost Hunters,[68] MonsterQuest, Ghost Adventures, The Secret Saturdays, Fact or Faked:
Coast To Coast AM hosts George Noory and Art Bell have explored the topic of EVP with featured guests
such as Brendan Cook and Barbara McBeath of the Ghost Investigators Society, and paranormal investigator
and ‘demonologist’ Lou Gentile.[69][70] The Spirit of John Lennon, a pay-per-view seance broadcast in 2006,
in which TV crew members, a psychic, and an “expert in paranormal activity” claim the spirit of former Beatle
John Lennon made contact with them through what was described as “an Electronic Voice Phenomenon
(EVP).”[71]
Legion, a 1983 novel by William Peter Blatty, contains a subplot where Dr. Vincent Amfortas, a terminally
ill neurologist, leaves a “to-be-opened-upon-my-death” letter for Lt. Kinderman detailing his accounts of contac
t with the dead, including the doctor’s recently deceased wife, Ann, through EVP recordings. Amfortas’ character
and the EVP subplot do not appear in the film version of the novel, Exorcist III. In Nyctivoe a 2001 vampire-inspired
play by Dimitris Lyacos the male character as well as his deceased companion are speaking from a recording
device amidst a static/white noise background. In Pattern Recognition, a 2003 novel by William Gibson, the main
character’s mother tries to convince her that her father is communicating with her from recordings after his
death/disappearance in the September 11, 2001 attacks.
Faster download manager
You know the story: although your ISP claims that your connection is lightning fast, those huge video files you just grabbed off Google Video and YouTube are taking forever to download. Most people figure that slow download speeds are normal. If you use the built-in download manager in your browser, it is normal. Fortunately, you can change that by simply getting a new download manager.
Here are a few to get you started; some are ugly, some are decidedly 1.0, and some even cost money (gasp!), but they all do the job.
Also see our related post: Download Everything: 30+ Firefox Add-ons for Downloading.
Windows Download Managers
AltarSoft Download Manager – Wonderful basic download manager with up to 10 simultaneous downloads. $14.95.
AmazingDown Studio – Claims speeds up to 500% faster than built-in download managers. Includes proxy support, bandwidth limiting, Internet Explorer integration, and many more powerful features. $21.95.
BlackWidow – Great app that scans the site and lists all the links. It will then download them for you. $39.95.
Chrysanth Download Manager – Powerful batch downloader that integrates with Internet Explorer. $29.95.
ConnectFusion – Fast (some sources claim speeds 50% faster than built-in download managers) and easy to use download manager. Free software.
DC-Sakura Boyish-Downloader – Simple manager with a scheduler, file sorter, an option to shutdown after downloading, and Internet Explorer integration. $19.98.
DLExpert – Powerful multithreaded download manager with scheduling, auto shutdown, clipboard integration, Internet Explorer integration, and much more. Freeware.
Download Accelerator Manager – Includes proxy support, a scheduler, an ability to follow redirects, a free space management gauge, an auto shutdown feature, and integration with Internet Explorer, Firefox, Opera, Netscape, Mozilla, Avant, and Maxthon. Freeware.
Download Accelerator Plus – Powerful app with advanced tools you won’t find anywhere else, like a file shredder and a cookie/history/temp cleaner. Also integrates with Internet Explorer, Firefox, Opera, Netscape, and Mozilla. Freeware (ad-supported).
Download Boost – Basic manager with acceleration up to 400% faster than built-in download managers and some nice features like scheduling and integration with Internet Explorer and Netscape. $19.00.
Download Commander – Nice multithreaded manager with Internet Explorer integration. Freeware.
Download Express – For people with limited computer resources, a small (~680 KB) app that integrates nicely into Internet Explorer, Firefox, Netscape, SeaMonkey, and Flock. Free for non-commercial use.
DownloadStudio – Download entire websites, streaming audio/video clips, search engine results, and more with this power tool. Integrates into Internet Explorer, Firefox, Opera, Netscape, Mozilla, Maxthon, NetCaptor, and Avant. $39.95.
File Downloader – Small command-line app that can be automated with scripts and batch files. $12.00.
File Rain – Basic download manager that claims speeds up to 800% faster than built-in managers. $19.95.
FlashGet – Powerful manager with support for sequences of files, multiple locations, and site spidering. Also supports the MMS and RTSP media protocols and the BitTorrent and eDonkey P2P protocols. Integrates into Firefox, Opera, Mozilla, SeaMonkey, Netscape, Avant, and Maxthon. Freeware.
Free Download Accelerator – Basic program with speeds up to 800% faster than built-in download managers. Freeware (ad-supported).
Fresh Download – A scheduler, clipboard monitor, antivirus scanning, proxy support, ZIP extractor, and integration into Internet Explorer, Firefox, Opera, Netscape, Avant, Maxthon, and Slim Browser are just a few of the features packed into this manager. Freeware.
GetGo – Claims speeds of up to 300% faster than built-in download managers, and includes virus detection and a scheduler. Integrates into Internet Explorer, Firefox, Netscape, and Flock. $30.00.
GetRight – Includes a scheduler, built-in MD5 and SHA-1 checksums, and BitTorrent, Metalink, and podcasting support. Internet Explorer, Firefox, Opera, and Netscape integration is provided. $16.95/yr.
Gigaget – Auto data integrity validation and correction, MMS, RTSP, and Flash support, Internet Explorer, Firefox, and Maxthon integration, and more are included in this great app. Freeware (ad-supported).
iFetcher – Easy to use download manager that works with Internet Explorer. Freeware.
Internet Download Accelerator – Proxy support, plugins, an FTP browser, archive previewing, integration with Internet Explorer, Firefox, Opera, Netscape, Mozilla, Maxthon, and NetCaptor, and much more are built into IDA. $29.95.
Internet Download Manager – Supports proxies, redirects, firewalls, and more. Includes both a command-line version and a GUI version. Works with Internet Explorer, Firefox, Opera, Netscape, Mozilla, MSN Explorer, Avant, Maxthon, and AOL. $29.95.
LeechGet – LeechGet is one of the easiest to use programs in this list. Don’t let that fool you: it packs in a ton of features, such as automatic downloading, resume of broken downloads, a download timer, automatic hang-up and shutdown, and integration with Internet Explorer, Mozilla, and Opera. Free for personal use.
Mass Downloader – Great batch downloader with support for streaming media and integration with Firefox, Netscape, Mozilla, and Flock. $19.95.
NetLeech – Sports proxy support, file splitting, file filters, file sorting, and Internet Explorer integration. Freeware.
Net Transport – Not only does it support the standard HTTP(S) and (S)FTP protocols, it supports the MMS, RTSP, and PNM streaming media protocols and the eDonkey and BitTorrent P2P protocols. Plus, it integrates with Internet Explorer, Firefox, and Opera. Freeware.
Orbit Downloader – Social site downloading is the main appeal of this program. It supports HTTP(S), FTP, Metalink, RTSP, PNM, MMS, NSS, RTMP, embedded video from sites like YouTube, music from sites like Pandora, and files from sites like Rapidshare. It works with Internet Explorer, Firefox, Opera, Netscape, and Maxthon. Freeware.
ReGet – Has basic, advanced, and expert versions, so there’s something in it for everyone. Integrates into Internet Explorer, Opera, Netscape, Mozilla, NetCaptor, NeoPlanet, and MSN Explorer. $9.95-$29.95.
SimpleDownload – A simple manager with support for features such as file sorting. Freeware.
SoftAtlas Download Accelerator – Provides size counting, tags, filters, categories, file splitting, support for RSS, ATOM, and podcasts, a scheduler, a virus scanner, and a file search tool. Internet Explorer integration available. $16.95.
Star Downloader – Includes categorization, automatic installation of installation programs, automatic extracting of archives, proxy support, and virus scanning. Integrates into Internet Explorer, Firefox, and Opera. $19.95 (includes a basic free version as well).
TrueDownloader – HTTP/FTP support, proxy support, and ZIP previewing are available with this great app. Internet Explorer, Firefox, and Mozilla integration provided. Free software.
VisualWget – A Wget (see below) front-end with support for skins and Internet Explorer integration. Free software.
WackGet – A minimalistic app that does a great job. Integrates with Internet Explorer. Free software.
Web Excavator – Powerful tool to download entire websites or files from websites. $14.95.
wGetGUI – Simple Wget (see below) front-end. Free software.
WinGet – Claims speeds up to 300% faster than built-in download managers. Integrates with Firefox and Opera. $19.00.
WinWGet – Another Wget (see below) front-end, with features such as clipboard monitoring, threaded downloading, job exporting, predefined user agents, ASP/PHP redirection, multiple FTP file and folder downloading, and bit rate limit. Free software.
YADA (Yet Another Download Accelerator) – Fast manager with drag ‘n’ drop, multithreading, batch downloading, and much more. Freeware.
Macintosh Download Managers
CocoaWget – Simple Cocoa front-end to Wget (see below). Free software.
cURL GUI – Basic AppleScript front-end for cURL (see below). Free software.
Interarchy – Powerful manager that supports (S)FTP, HTTP(S), WebDAV(S), iDisk, and Amazon S3 and includes Growl support, file encoding, Dashboard, Safari integration, and much more. $59.95 ($29.95 upgrade).
Simple cURL – AppleScript GUI for cURL (see below). Free software.
Speed Download – Smart folders, iDisk support, auto add to iTunes, Safari integration, filters, file sharing, and much more are packed inside this power user tool. $25
Linux Download Managers
Downloader for X – Simple Linux download manager. Free software.
Gwget – A Wget (see below) front-end for Gnome with integration with Firefox and Epiphany. Free software.
KGet – Minimalistic manager, but works well with KDE and the Konqueror browser. Free software.
Cross-Platform Download Managers
cURL – A command-line app that supports (S)(T)FTP(S), HTTP(S), SCP, Telnet, DICT, FILE, and LDAP and includes tons of features. Windows, Macintosh, and Linux. Free software.
curl::gui – A simple GUI for cURL. Windows and Linux. Free software.
DownThemAll – Fast and powerful Firefox extension that includes a nice spidering tool. Windows, Macintosh, and Linux. Free software.
FlashGot – Not actually a download manager, the FlashGot Firefox extension will use an existing download manager to grab every type of link you tell it to. Windows, Macintosh, and Linux. Freeware.
Getleft – Batch downloads files using cURL. Windows, Macintosh, and Linux. Free software.
iGetter – Powerful tool with a site explorer, queues, scheduling, and much more. Integrates into Firefox, Mozilla, Safari, and Camino. Windows and Macintosh. $25.
Retriever – Java tool with a scheduler, BitTorrent support, proxy support, mirroring, and an option to execute programs on download. Windows, Macintosh, and Linux. Freeware.
Super Downloader – Fast Java downloader. Windows, Macintosh, and Linux. Freeware.
Urlgfe – Front-end to cURL and Wget. Windows and Linux. Free software.
Wget – Another powerful command-line tool with support for HTTP(S) and FTP, site downloading, proxy support, site spidering, bandwidth limiting, and a whole lot more. Windows, Macintosh, and Linux. Free software.
wget:gui – A nice interface to Wget. Windows and Linux. Free software.
wxDownload Fast – Download splitting, scheduling, organizing, HTTP, FTP, Metalink, and file:///, and MD5 and SHA-1 checksums are all available in this great cross-platform tool. Windows, Macintosh (partial support), and Linux. Free software.
See also:
IPHONE TOOLBOX: 75+ iPhone Resources
30+ WordPress 3-Column Themes
Freelancers’ Toolbox – 30+ Online Freelance Resources
EBAY TOOLBOX: 50+ Tools for eBay Buyers and Sellers
30+ WordPress Plugins To Get More Blog Readers
DOWNLOAD EVERYTHING: 30+ Firefox Add-ons For Downloading Images, Videos & Files
Facebook Powertools: 150+ Apps, Scripts and Add-ons for Facebook
CMS Toolbox: 80+ Open Source Content Management Systems
Make Money Online: 100+ Tools and Resources
Q&A TOOLBOX: 30+ Tools For Questions and Advice
ONLINE STORAGE: 80+ File Hosting and Sharing Sites
Web Development Toolbox: 120+ Web Development Resources
50+ WordPress Plugins for Multimedia
GTD NINJA: 50+ Websites For the Kickass Control Freak
50+ Tools For The WordPress Admin
PDF Toolbox: 40+ Tools to Rip, Mix and Burn PDFs
Web Design Toolbox: 50+ Tools for Web Design
30+ Plugins for WordPress Comments
50+ Tools For Torrenting
ONLINE MEDIA GOD: 400+ Tools for Photographers, Videobloggers, Podcasters & Musicians
Online Maps: 50+ Tools and Resources
Work Together: 60+ Collaborative Tools for Groups
ONLINE PRODUCTIVITY GOD: 400+ Resources To Make You Smarter, Faster & a Demon in the Sack
30+ AJAX-Powered WordPress Plugins
70+ Tools For Job Hunting 2.0
40+ Firefox Add-ons for High Speed Blogging
20 Ways To Aggregate Your Social Networking Profiles
Online Music: 90+ Essential Music and Audio Websites
Podcasting Toolbox: 70+ Podcasting Tools and Resources
Blogging Toolbox: 120+ Resources for Bloggers
14 Personalized Homepages Compared, Feature by Feature
230+ Keyboard Shortcuts for Top Web Services
Online Photography Toolbox: 90+ Online Photography Tools and Resources
Video Toolbox: 150+ Online Video Tools and Resources
Online Productivity Toolbox: 30+ Resources to Get Things Done
The Ultimate RSS Toolbox – 120+ RSS
How to enable IPv6 in
Step-by-Step Guide for Setting Up IPv6 in a Test Lab
12 out of 17 rated this helpful – Rate this topic
Updated: July 27, 2006
Applies To: Windows Server 2003, Windows Server 2003 R2, Windows Server 2003 with SP1, Windows Server 2003 with SP2
This guide provides detailed information about how you can use five computers to create a test lab with which to configure and test IPv6 with the Microsoft® Windows® XP Professional with Service Pack 2 (SP2) operating system and the 32-bit versions of the Windows Server™ 2003 with Service Pack 1 (SP1) operating system. These step-by-step instructions take you through the configuration required for setting up IPv6 in the test lab.
| The following instructions are for configuring a test lab using a minimum number of computers. Individual computers are needed to separate the services provided on the network and to clearly show the desired functionality. This configuration is neither designed to reflect best practices nor is it designed to reflect a desired or recommended configuration for a production network. The configuration, including IP addresses and all other configuration parameters, is designed only to work on a separate test lab network. |
Setting up the IPv6 infrastructure
The infrastructure for the IPv6 test lab network consists of five computers performing the following services:
- A computer running Windows Server 2003 with SP1, Standard Edition, that is used as a Domain Name System (DNS) server. This computer is named DNS1.
- A computer running Windows XP Professional with SP2 that is used as a client. This computer is named CLIENT1.
- A computer running Windows Server 2003 with SP1, Standard Edition, that is used as a router. This computer is named ROUTER1.
- A computer running Windows Server 2003 with SP1, Standard Edition, that is used as a router. This computer is named ROUTER2.
- A computer running Windows XP Professional with SP2 that is used as a client. This computer is named CLIENT2.
The following figure shows the configuration of the IPv6 test lab.
 In the preceding figure, there are three network segments:
- Subnet 1 uses the private IP subnet prefix of 10.0.1.0/24 and global subnet prefix of 2001:DB8:0:1::/64.
- Subnet 2 uses the private IP subnet prefix of 10.0.2.0/24 and global subnet prefix of 2001:DB8:0:2::/64.
- Subnet 3 uses the private IP subnet prefix of 10.0.3.0/24 and global subnet prefix of 2001:DB8:0:3::/64.
All computers on each subnet are connected to a separate common hub or Layer 2 switch. The two router computers, ROUTER1 and ROUTER2, have two network adapters installed.
For the IPv4 configuration, each computer is manually configured with the appropriate IP address, subnet mask, default gateway, and DNS server IP address. For the IPv6 configuration, link-local addresses are used initially. Dynamic Host Configuration Protocol (DHCP) and Windows Internet Name Service (WINS) servers are not used.
The configuration of the lab routing infrastructure goes through three phases.
- IPv4 routing. This phase demonstrates IPv4 connectivity and the automatic configuration of IPv6 local-link addresses – similar to Automatic Private IP Addressing (APIPA).
- IPv6 routing. This phase demonstrates all test lab nodes can be reached by using IPv6 traffic.
- ISATAP routing. ISATAP is an address assignment and automatic tunneling technology that is used to provide unicast IPv6 connectivity between IPv6/IPv4 hosts over an IPv4 intranet. This phase removes IPv6 connectivity for Subnet 2 and Subnet 3 and restores it using ISATAP.
The following sections describe how to configure each of the computers in the test lab with the basic IPv6 infrastructure. To create this test lab, configure the computers in the order presented.
Consider using Virtual PC or Virtual Server
Microsoft Virtual PC or Virtual Server allow you to create the computer lab used in this document using only one physical computer. After the virtual lab is configured, you can switch between the five virtual computers needed for this lab with the click of a button. For more information, see the following resources:
- Virtual PC 2004 Product Information (http://go.microsoft.com/fwlink/?LinkId=69217)
- Virtual Server Product Information (http://go.microsoft.com/fwlink/?LinkId=69220)
- Do More With Less: Exploring Virtual Server 2005 (http://go.microsoft.com/fwlink/?LinkId=69221)
- TechNet Webcast: Virtual Server 2005 – Setting Up a Virtual Test and Development Environment—Level 200 (http://go.microsoft.com/fwlink/?LinkId=69222)
DNS1
DNS1 is a computer running Windows Server 2003 with SP1, Standard Edition. It is providing DNS Server services for the testlab.microsoft.com DNS domain. To configure DNS1 for this service, perform the following steps.
Configure DNS1 to provide DNS Services
Configure DNS1 to provide DNS Services
- Install Windows Server 2003 with SP1, Standard Edition, as a standalone server. Set the Administrator password.
- After restarting, log on as Administrator.
- Configure the TCP/IP protocol with the IP address of 10.0.1.2, the subnet mask of 255.255.255.0, and the default gateway of 10.0.1.1.
Install the DNS Server service
- Open Windows Components Wizard. To open the Windows Components Wizard, click Start, click Control Panel, double-click Add or Remove Programs, and then click Add/Remove Windows Components.
- In Components, select the Networking Services check box, and then clickDetails.
- In Subcomponents of Networking Services, select the Domain Name System (DNS) check box, click OK, and then click Next.
- If prompted, in Copy files from, type the full path to the distribution files, and then click OK.
Define a forward lookup zone named testlab.microsoft.com that allows dynamic updates.
Define a forward lookup zone
- Open DNS. To open DNS, click Start, select Administrative Tools, and then click DNS.
- In the console tree, click and then right-click the DNS server DNS1, and then click New Zone to run the New Zone Wizard.
- On the Welcome to the New Zone Wizard page, click Next.
- On the Zone Type page, the option to create a primary zone is selected by default. Click Next.
- On the Forward or Reverse Lookup Zone page, the option to create a forward lookup zone is selected by default. Click Next.
- On the Zone Name page, type testlab.microsoft.com in Zone name. ClickNext.
 Note
NoteThe domain name testlab.microsoft.com is used here for example purposes only. You can use any domain name in your test lab configuration. - On the Zone File page, the new zone file name, testlab.microsoft.com.dns, is automatically derived from the zone name entered on the previous page, as shown in the following figure. Click Next.

- On the Dynamic Update page, select Allow both nonsecure and secure dynamic updates. Click Next.
- Click Next. On the Completing the New Zone Wizard page, click Finish.
Install IPv6
- On DNS1, at the command prompt, type:
netsh interface ipv6 install
CLIENT1
CLIENT1 is a computer that is being used as a client.
Configure CLIENT1 as a client computer
Configure CLIENT1 as a client computer
- Install Windows XP Professional with SP2 as a workgroup computer. Set the Administrator password.
- After restarting, log on as Administrator.
- At the command prompt, install the IPv6 protocol by typing:
netsh interface ipv6 install - Configure the TCP/IP protocol with the IP address of 10.0.1.3, the subnet mask of 255.255.255.0, a default gateway of 10.0.1.1, and the DNS server IP address of 10.0.1.2.
- Append the DNS suffix testlab.microsoft.com. Click Start, click Control Panel, click Network and Internet Connections, and then click Network Connections. Right-click the network connection that you want to configure, and then clickProperties. On the General tab, click Internet Protocol (TCP/IP), and then click Properties. Click Advanced, and then click the DNS tab. Addtestlab.microsoft.com to the list of DNS suffixes, as show in the following dialog box:

Windows Firewall is automatically turned on in Windows XP Professional with SP2. You need to configure an exception to allow CLIENT2 to ping CLIENT1.
Configure Windows to allow communication between client computers
- Click Start, point to Control Panel, and then click Security Center.
- Click Windows Firewall, and then in the Windows Firewall dialog box, click the Advanced tab.
- Click Settings for ICMP, and then click Allow incoming echo request.
- Click OK twice to close Windows Firewall.
ROUTER1
ROUTER1 is a computer that is being used as a router between Subnet 1 and Subnet 2.
Configure ROUTER1 as a router
Configure ROUTER1 as a router
- Install Windows Server 2003 with SP1, Standard Edition, as a workgroup computer. Set the Administrator password.
- After restarting, log on as Administrator.
- At the command prompt, install the IPv6 protocol by typing:
netsh interface ipv6 install - In Control Panel-Network Connections, rename the LAN connection connected to Subnet 1 to Subnet 1 Connection and rename the LAN connection connected to Subnet 2 to Subnet 2 Connection.
- For Subnet 1 Connection, configure the TCP/IP protocol with the IP address of 10.0.1.1, the subnet mask of 255.255.255.0, and the DNS server IP address of 10.0.1.2.
- For Subnet 2 Connection, configure the TCP/IP protocol with the IP address of 10.0.2.1, the subnet mask of 255.255.255.0, and a default gateway of 10.0.2.2.
- Start the registry editor (Regedit.exe) and set HKEY_LOCAL_MACHINE\SYSTEM\CurrentControlSet\ Services\Tcpip\Parameters\\IPEnableRouter to 1.
This step enables IPv4 routing between Subnet 1 and Subnet 2. - Restart the computer.
ROUTER2
ROUTER2 is a computer that is being used as a router between Subnet 2 and Subnet 3.
Configure ROUTER2 as a router
Configure ROUTER2 as a router
- Install Windows Server 2003 with SP1, Standard Edition, as a workgroup computer. Set the Administrator password.
- After restarting, log on as Administrator.
- At the command prompt, install the IPv6 protocol by typing:
netsh interface ipv6 install - Open Network Connections, and rename the LAN connection connected to Subnet 2 to Subnet 2 Connection, and rename the LAN connection connected to Subnet 3 to Subnet 3 Connection.
- For Subnet 2 Connection, configure the TCP/IP protocol with the IP address of 10.0.2.2, the subnet mask of 255.255.255.0, and a default gateway of 10.0.2.1.
- For Subnet 3 Connection, configure the TCP/IP protocol with the IP address of 10.0.3.1 and the subnet mask of 255.255.255.0.
- Start the registry editor (Regedit.exe) and set HKEY_LOCAL_MACHINE\SYSTEM\CurrentControlSet\ Services\Tcpip\Parameters\IPEnableRouter to 1.
This step enables IPv4 routing between Subnet 2 and Subnet 3. - Restart the computer.
CLIENT2
CLIENT2 is a computer that is being used as a client.
Configure CLIENT2 as a client computer
Configure CLIENT2 as a client computer
- Install Windows XP Professional with SP2 as a workgroup computer. Set the Administrator password.
- After restarting, log on as Administrator.
- At the command prompt, install the IPv6 protocol by typing:
netsh interface ipv6 install - Configure the TCP/IP protocol with the IP address of 10.0.3.2, the subnet mask of 255.255.255.0, a default gateway of 10.0.3.1, and the DNS server IP address of 10.0.1.2, and append the DNS suffix testlab.microsoft.com.
- Verify the integrity of the IPv4 routing infrastructure by pinging 10.0.1.3 from the CLIENT2 computer. On CLIENT2, type the following command:
ping 10.0.1.3
You should be able to successfully ping CLIENT1.
Link-local addresses
Link-local addresses, identified by the beginning address block FE80, are equivalent to APIPA IPv4 addresses autoconfigured on computers running current Microsoft Windows operating systems using the 169.254.0.0/16 prefix. One of the most useful aspects of IPv6 is its ability to automatically configure itself without the use of a stateful configuration protocol, such as Dynamic Host Configuration Protocol for IPv6 (DHCPv6). By default, an IPv6 node configures a link-local address for each interface. Link-local addresses are used by nodes when communicating with neighboring nodes on the same link (a network segment bounded by routers). The scope of a link-local address is the local link. An IPv6 router never forwards link-local traffic beyond the link.
Link-local ping
At this point in the lab configuration, only IPv4 traffic across the subnets is routed through an IPv4 routing infrastructure. However, you should be able to successfully ping neighboring link-local addresses. After the lab is configured to route IPv6 traffic, you will be able to successfully ping using global addresses.
Determine and ping the link-local address of CLIENT1 from DNS1
Determine and ping the link-local address of CLIENT1 from DNS1
- On CLIENT1, type the ipconfig command to obtain the link-local address and interface index of the interface named Local Area Connection.
 In this example, the link-local address is FE80::203:FFFF:FEE1:2A73 and the interface index is 5.
 - On DNS1, type the ipconfig command to obtain the interface index of the interface named Local Area Connection.
In this example, the interface index of Local Area Connection is 4.

- On DNS1, ping the IPv6 link-local address of CLIENT1. You must use the interface index of the sending interface, the Local Area Connection interface of DNS1. For example, using the example configuration in step 1:
ping FE80::203:FFFF:FEE1:2A73%4
A successful ping demonstrates that CLIENT1 and DNS1 are neighbors on the same link.
Creating a static IPv6 routing infrastructure
Configure a static IPv6 routing infrastructure so that all test lab nodes can be reached by using IPv6 traffic.
Create a static IPv6 routing infrastructure
Create a static IPv6 routing infrastructure
- On ROUTER1, type the ipconfig command to obtain the link-local addresses of the interfaces connected to Subnet 1 Connection and Subnet 2 Connection.
 For this example, the information is as follows:
Subnet 1 Connection – FE80::203:FFFF:FEE1:FA74
Subnet 2 Connection – FE80::203:FFFF:FEFC:FA75 - On ROUTER2, type the ipconfig command to obtain the link-local addresses of the interfaces connected to Subnet 2 Connection and Subnet 3 Connection.
 For this example, the information is as follows:
Subnet 2 Connection – FE80::203:FFFF:FEE0:FA76
Subnet 3 Connection – FE80::203:FFFF:FEFD:FA77 - On ROUTER1, type the following commands:
- netsh interface ipv6 set interface “Subnet 1 Connection” forwarding=enabled advertise=enabled
- netsh interface ipv6 set interface “Subnet 2 Connection” forwarding=enabled advertise=enabledSteps a. and b. configure the Subnet 1 and 2 Connection interfaces to route (forward IPv6 packets not addressed to them) and advertise subnet prefixes (for address autoconfiguration).
- netsh interface ipv6 add route 2001:db8:0:1::/64 “Subnet 1 Connection” publish=yes
- netsh interface ipv6 add route 2001:db8:0:2::/64 “Subnet 2 Connection” publish=yesSteps c. and d. add routes to the IPv6 routing table corresponding to the subnet prefix for Subnet 1 and 2 and configures the router to advertise these routes in Router Advertisement messages.
- netsh interface ipv6 add route ::/0 “Subnet 2 Connection” nexthop=ROUTER2AddressOnSubnet2 publish=yesStep e. adds the default route to the IPv6 routing table and configures the router to advertise itself as a default router in the Router Advertisement messages.
In the preceding command, ROUTER2AddressOnSubnet2 represents the link-local address assigned to the Subnet 2 Connection interface on ROUTER2. For example, using the connection in this lab the command would be:
netsh interface ipv6 add route ::/0 “Subnet 2 Connection” nexthop= FE80::203:FFFF:FEE0:FA76 publish=yes - On ROUTER2, type the following commands:
- netsh interface ipv6 set interface “Subnet 2 Connection” forwarding=enabled advertise=enabled
- netsh interface ipv6 set interface “Subnet 3 Connection” forwarding=enabled advertise=enabled
- netsh interface ipv6 add route 2001:db8:0:2::/64 “Subnet 2 Connection” publish=yes
- netsh interface ipv6 add route 2001:db8:0:3::/64 “Subnet 3 Connection” publish=yes
- netsh interface ipv6 add route ::/0 “Subnet 2 Connection” nexthop=ROUTER1AddressOnSubnet2 publish=yes
In the preceding command, ROUTER1AddressOnSubnet2 represents the link-local address assigned to the Subnet 2 Connection interface on ROUTER1. For example, using the connection in this lab the command would be:
netsh interface ipv6 add route ::/0 “Subnet 2 Connection” nexthop= FE80::203:FFFF:FEFC:FA75 publish=yes
Global addresses
At this point, you have now created static IPv6 routes with global subnet prefixes. Global addresses are equivalent to the IPv4 public address space. Unlike link-local addresses, global addresses are not automatically configured and must be assigned either through stateless or stateful address configuration processes. You can determine which address is the global address by the “ff:fe” portion of the public address in the sixth and seventh blocks of the address, indicating an EUI-64-based interface ID. The Extended Unique Identifier (EUI)-64 address is a newer 64-bit MAC address.
Global ping
Verify the IPv6 routing structure
- On CLIENT1, type the ipconfig command to check for a new global IPv6 address.
 In this example, the CLIENT1 global address is 2001:DB8:0:1:203:FFFF:FEE1:2A73.
 - On CLIENT2, type the following commands:
ping CLIENT1GlobalAddress
tracert -d CLIENT1GlobalAddress
In this example, the CLIENT1 global address is 2001:DB8:0:1:203:FFFF:FEE1:2A73.
A successful ping and tracert demonstrates that IPv6 static routes have been created and are functioning. - You can view the entries in the ROUTER1 neighbor cache for CLIENT1 and ROUTER2, by typing the following on ROUTER1:
netsh interface ipv6 show neighbors
Using name resolution
To resolve host names to IPv6 addresses, you must first configure DNS. On DNS1, create an AAAA record for CLIENT2 with the DNS name client2.testlab.microsoft.com for its global IPv6 address using the IPv6 Host resource record type.
Configure DNS to resolve names to IPv6 addresses
Configure DNS to resolve names to IPv6 addresses
- On DNS1, click Start, select Administrative Tools, and then click DNS.
- In the console tree, click and then right-click testlab.microsoft.com in theForward Lookup Zones folder, and then click Other New Records.
- Click IPv6 Host (AAAA), and then click Create Record.
- In the Host text box type client1, and then in the IP version 6 host addresstext box, enter the IPv6 global address for CLIENT1.
In this example, the CLIENT1 global address is 2001:DB8:0:1:203:FFFF:FEE1:2A73.

- Click OK, and then click Done to add the new IPv6 host record to the zone.
- On CLIENT 2, type the following command:
ping client1
A successful ping demonstrates that host names can resolve to IPv6 addresses.
Configuring the test lab to use ISATAP
ISATAP is an address assignment and automatic tunneling technology that is used to provide unicast IPv6 connectivity between IPv6/IPv4 hosts on an IPv4 intranet, which are also known as ISATAP hosts. ISATAP is described in RFC 4214. More information about ISATAP can be found in the IPv6 Transition Technologies white paper (http://go.microsoft.com/fwlink/?LinkId=67210). By default, the IPv6 protocol for Windows XP Professional with SP2 and Windows Server 2003 with SP1, Standard Edition, configures a link-local ISATAP address on the Automatic Tunneling Pseudo-Interface for each IPv4 address assigned to a computer.
To configure global ISATAP addresses, or to communicate beyond the logical subnet defined by the IPv4 intranet, you need an ISATAP router. An ISATAP router performs the following functions:
To configure global ISATAP addresses, or to communicate beyond the logical subnet defined by the IPv4 intranet, you need an ISATAP router. An ISATAP router performs the following functions:
- Advertises its presence and address prefixes, enabling global ISATAP addresses to be configured.
- Optionally forwards IPv6 packets between ISATAP hosts on the IPv4 intranet and IPv6 hosts beyond it.
An ISATAP router is typically configured to perform both functions, but can perform either individually. Most often, an ISATAP router acts as the forwarder between ISATAP hosts on an IPv4 intranet and IPv6 hosts on an IPv6-enabled portion of an intranet.
To demonstrate the use of an ISATAP router between IPv6 and IPv4 intranets, the following steps first separate the lab into a portion that has IPv4 and IPv6 connectivity and another that has IPv4 connectivity only. Then, ROUTER1 is configured as an ISATAP router so that hosts on the IPv4-only portion of the intranet can communicate with hosts on the IPv6-enabled portion of the intranet.
To do this, we will disable IPv6 forwarding and advertising on the Subnet 2 Connection interface of ROUTER1 and both interfaces of ROUTER2. This emulates an intranet in which a portion is IPv6-enabled (Subnet 1) and a portion is not (Subnet 2 and Subnet 3).
Configure the test lab to use ISATAP
- Disable forwarding and advertising on the Subnet 2 Connection interface of ROUTER1 and ROUTER2.
- On ROUTER1, at the command prompt, type:netsh interface ipv6 set interface “Subnet 2 Connection” forwarding=disabled advertise=disabled
- On ROUTER2, at the command prompt, type:netsh interface ipv6 set interface “Subnet 2 Connection” forwarding=disabled advertise=disabled
- Disable forwarding and advertising on the Subnet 3 Connection interface. On ROUTER2, at the command prompt, type:
netsh interface ipv6 set interface “Subnet 3 Connection” forwarding=disabled advertise=disabled - Renew CLIENT2 configuration to remove the global address and route. On CLIENT2, type the following command:
netsh interface ipv6 renew - Ping CLIENT1 from CLIENT2. On CLIENT2, type the following command:
ping CLIENT1GlobalAddress
or
ping client1
In this example, the CLIENT1 global address is 2001:DB8:0:1:203:FFFF:FEE1:2A73.
This Ping command fails because there is no longer IPv6 connectivity between CLIENT2 and CLIENT1. - Configure ROUTER1 as an ISATAP router advertising the 2001:DB8:0:10::/64 route to the logical ISATAP subnet consisting of Subnet 2 and Subnet 3.
- On ROUTER1, enable forwarding and advertising on the Automatic Tunneling Pseudo-Interface, using the following commands:netsh interface ipv6 isatap set router 10.0.2.1netsh interface ipv6 set interface “Automatic Tunneling Pseudo-Interface” forwarding=enabled advertise=enabled
- On ROUTER1, add a route for the subnet prefix of the logical subnet of the IPv4 intranet to the Automatic Tunneling Pseudo-Interface and configure it to be published. Use the following command:netsh interface ipv6 add route 2001:db8:0:10::/64 “Automatic Tunneling Pseudo-Interface” publish=yes
- Add an ISATAP address (A) resource record to the DNS server for the IPv4 address of 10.0.2.1.
- On DNS1, click Start, select Administrative Tools, and then click DNS.
- In the console tree, click and then right-click testlab.microsoft.com in the Forward Lookup Zones folder, and then click New Host (A).
- In the Name text box, type ISATAP, and in the IP address text box, type 10.0.2.1, as shown in the following figure.

- Click Add Host, click OK, and then click Done to add the new host record to the zone.
- Renew the CLIENT2 configuration to recognize the ISATAP router IPv4 address of ROUTER1 and obtain an ISATAP address with the global prefix of 2001:DB8:0:10::/64. On CLIENT2, type the following command:
netsh interface ipv6 renew - Ping CLIENT1 from CLIENT2. On CLIENT2, type the following command:
ping CLIENT1GlobalAddress
or
ping client1
In this example, the CLIENT1 global address is 2001:DB8:0:1:203:FFFF:FEE1:2A73.
This ping command succeeds because IPv6 connectivity using ISATAP now exists between CLIENT2 and CLIENT1. On the link between CLIENT1 and ROUTER1, the IPv6 traffic is encapsulated as IPv4 packets.
| It may take a few minutes for IPv6 connectivity between CLIENT2 and CLIENT1 to be established. You may need to restart CLIENT2 and run netsh interface ipv6 renew on CLIENT1. |
Conclusion
This guide described the steps required to configure IPv6 in a test lab with five computers. It also described how to use ISATAP to provide IPv6 connectivity between IPv6/IPv4 hosts on an IPv4-only portion of an intranet and IPv6 hosts on an IPv6-enabled portion of an intranet.
Additional references
For more information, see the following resources:
- Microsoft IPv6 Web site (http://go.microsoft.com/fwlink/?LinkId=24350)
- Introduction to IPv6 (http://go.microsoft.com/fwlink/?LinkId=69223)
- Support WebCast: Introduction to Internet Protocol Version 6 (http://go.microsoft.com/fwlink/?LinkId=69224)
- Using Windows Tools to Obtain IPv6 Configuration Information (http://go.microsoft.com/fwlink/?LinkId=69225)
- Windows Server 2003 Web site (http://go.microsoft.com/fwlink/?LinkId=5221)
IPv6hostswindows
Contents
IPv6 installation for Windows users
What is the status of IPv6 support in Microsoft Operating Systems?
IPv6 is officially supported in Windows XP after Service Pack 1 and Windows Server 2003 (any version) and in Windows Vista.
There is experimental support for IPv6 in Windows XP (without service pack).
There is a Microsoft Research implementation for Windows NT4.0 and Windows 2000 here:http://research.microsoft.com/msripv6/msripv6.htm
There is a Technology Preview implementation for Windows 2000 here:http://msdn.microsoft.com/downloads/sdks/platform/tpipv6.asp
Unlessthere is a reason for it, the Windows XP SP1 (or later) and/or Windows Server 2003 implementation should be used for IPv6.
There is no Microsoft implementation of IPv6 in the 95/98/ME line of Microsoft Windows, however there is an IPv6 protocol stack for Windows 95/98 and Windows NT athttp://www.trumpet.com.au/winsock/winsoc5.html
How to enable IPv6 in Windows XP (service pack 1 and later) or in Windows Server 2003?
IPv6 is officially supported in XP from Service Pack 1 and later and in Windows Server 2003. Because there are other serious reasons to install service pack 1, the following applies to XP SP1, with the differences noted later.
IPv6 can be installed the same way, as any other network protocol. Go to Control Panel, networks, network connections. Right click on the network connection, choose properties! Then Add, Protocol, Microsoft TCP/IP version 6.
That’s all! IPv6 should be up and running. Use the command line utility ipconfig to verify the IPv6 addresses and interfaces.
How to enable IPv6 in Windows XP (no service pack)?
On Windows XP, no service pack, IPv6 is not available in the Add protocols dialog, it can be installed by typing ipv6 install on the command line. The ipv6 command can be used to verify operation.
If IPv6 is installed on a machine without service pack, and later upgraded to SP1, ipv6 uninstallis necessary to have IPv6 installable from control panel.
What is new for IPv6 in Windows XP SP2?
Windows XP SP2 includes the updates to IPv6 that are also included in the Advanced Networking Pack for Windows XP plus some bug fixes for IPv6:
; IPv6 ICF : IPv6 Connection Firewall that allows filtering unsolicited incoming IPv6 traffic. ; Teredo : Teredo, also known as IPv6 NAT traversal, is an IPv6/IPv4 transition technology that provides unicast IPv6 connectivity across the IPv4 Internet when the communicating peers are separated by one or more NATs. This is kind of hack that can be avoided most of the cases with proper setup of NAT boxes (i.e.: providing NAT and IPv6 connectivity in the same time). ; Host specific relay : The portproxy is a tool that act as proxies between IPv4 and IPv6 networks and applications
How to enable IPv6 in Windows Vista?
IPv6 is enabled by default in Windows Vista. It can be disabled by uninstalling the IPv6, or different IPv6 features may be enabled or disabled individually by setting the following registry value:
HKEY_LOCAL_MACHINE\SYSTEM\CurrentControlSet\Services\tcpip6\Parameters\DisabledComponents
The value can be the combination (logical or) of the follwoing values:
|
1
|
Disable tunnel interfaces
|
|
2
|
Disable 6to4
|
|
4
|
Disable ISATAP
|
|
8
|
Disable Teredo
|
|
16
|
Disable LAN and PPP interfaces
|
|
32
|
Set preference of IPv4 over IPv6
|
|
255
|
Disable IPv6 completely
|
How can I configure IPv6 on Windows systems
You should use netsh commands in interface ipv6 context to query and configure IPv6 interfaces, address, caches, and routes. As a backward compatibility interface you can useipv6.exe command (‘ Note: ipv6.exe command is not available on Windows 2003 machines.‘).
How can change the address selection policy?
In Windows XP and Windows 2003 you can define address selection defined RFC 3484. For this purpose you can use netsh interface ipv6 command.
- Adding policy rule
netsh interface ipv6 set prefixpolicy
- Showing policy rules:
netsh interface ipv6 show prefixpolicy
- Clearing policy rule table
netsh interface ipv6 clear prefixpolicy
See some examples in FreeBSD configuration section.
What is different in Windows Vista?
Windows Vista supports IPv6 out of the box and it is enabled at installation. There is now graphical user interface for setting basic IPv6 parameters, available through the properties button on the properties panel for the network connection.
Setting IPv6 properties
Using the IPv6 properties pane, manual or automatic address configuration can be selected. Vista will use stateless autoconfiguration to obtain prefix and gateway information or DHCPv6 to obtain DNS server information. On the Advanced Settings pane, multiple addressess and gateway can be selected.
IPv6 parameters can also be set using the
netsh interface ipv6
command. For example to set IPv6 address, the
netsh interface ipv6 add address 5 2001:2000:4030::2
can be used. 4 is the interface index, which can be queried with
netsh interface ipv6 show interface
command. Instead of the interface index, the interface name (such as “Local Area Connection”) may be given.
Vista applications
Internet Explorer 7 and Windows Mail (Outlook Express in Vista) supports IPv6, without further configuration. In IE7 it is possible to enter literal IPv6 addresses in the address bar. Windows Mail uses IPv6 if the domain name for the servers resolvs to IPv6.
To install IPv6
| 1. | Open Network Connections |
| 2. | Right-click any local area connection, and then click Properties. |
| 3. | Click Install. |
| 4. | In the Select Network Component Typedialog box, click Protocol, and then clickAdd. |
| 5. | In the Select Network Protocol dialog box, click Microsoft TCP/IP version 6, and then click OK. |
| 6. | Click Close to save changes to your network connection. |
Note
| • | To open Network Connections, click Start, click Control Panel, click Network and Internet Connections, and then click Network Connections. |
How to install and configure IP version 6 in Windows Server 2003 Enterprise Server
This article describes how to install and configure IP version 6 (IPv6) in a Windows Server 2003 Enterprise Edition environment. The current version of IP (which is known as IP version 4 or IPv4) has not been substantially changed since RFC 791 was published in 1981. IPv4 has proven to be robust, easily implemented and interoperable, and has stood the test of scaling an inter-network to a global utility the size of today’s Internet. This is a tribute to its initial design.
click link
http://support.microsoft.com/kb/325449d
http://support.microsoft.com/kb/325449d
How to install and uninstall IPv6 in Windows XP
Article ID: 2478747 – View products that this article applies to.
System TipThis article applies to a different version of Windows than the one you are using. Content in this article may not be relevant to you. Visit the Windows 7 Solution Center
 SUMMARY
Internet Protocol Version 6 (IPv6), is the full form of IPv6 which is the “next generation” protocol designed by the IETF to replace the current version Internet Protocol (IP Version 4 (“IPv4”)). Windows XP includes IPv6 implementation, but IPv6 must be installed.
MORE INFORMATION
How to install and uninstall IPv6:To install IPv6 on your Windows XP computer, follow these steps:Click Start, click All Programs, click Accessories, and then click Command Prompt.
At the command prompt, type netsh int ipv6 install and press the Enter key on your keyboard.
Close the Command Prompt window.
To uninstall IPv6 on your Windows XP computer, follow these steps:
Click Start, click All Programs, click Accessories, and then click Command Prompt.
At the command prompt, type: netsh int ipv6 uninstall and press the Enter key on your keyboard.
Close the Command Prompt window and restart the computer.
For more information about IPv6 click the following links to view the article on the Microsoft website:
